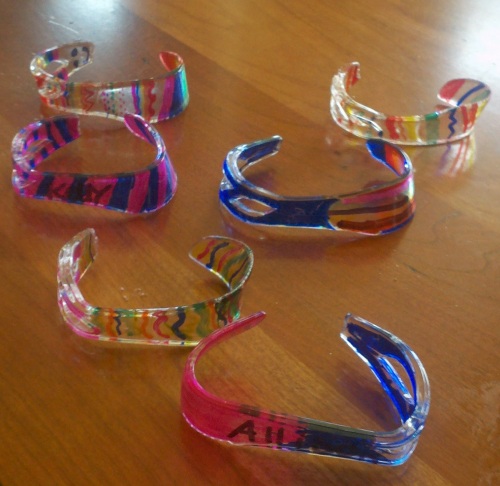
I got the idea to make melted plastic art forms from the blog ARTASTIC! . They melted sheets of plastic like Shrinky Dinks as well as plastic cups for really neat results. I changed it up a bit and tried it with melting plasticware. My niece and I did this activity together. It was super easy and so much fun for both of us. We made really cool plastic bracelets and other modern-art-like plastic forms.
Here’s what you’ll need to try the project yourself:
* Clear plastic cutlery (#6 Polystyrene Plastic)
* Colored Sharpie Markers
* Toaster oven (or regular oven)
* Cooking tray or cookie sheet
* Aluminum foil
* Metal tongs
The process is fairly simple. You will first want to pre-heat your oven. We heated it up to 350. Then, cover the tray or cookie sheet with tin foil to protect the tray.
To make plastic forms, simply chose a plastic fork, spoon, or knife. Then color designs on it with the Sharpie markers. When you are satisfied with your design, set the plasticware on the foil lined tray and put it in the oven (this is obviously an adult duty). Now, watch the magic happen! These work a lot like Shrinky Dinks, they will shrink and curl up as they heat up. Keep an eye on it; it’s neat to watch and it happens quickly. When they are the size and shape you like, an adult can take them out of the oven using oven mitts. Do not touch until they have cooled and hardened. If you’d like to adjust the shape of them a little, an adult can use the metal tongs to shape it a bit immediately after it comes out of the oven and is still hot and moldable.

To make the bracelets, we used the plastic knifes. If you’d like, you can sand down the serrated edge before you start. Just like with the plastic forms, color the knives however you’d like using the Sharpie markers. When finished, put the knives on the foil lined sheet colored side down. Putting the colored side down ensures that the colored side will be on the outside of the bracelet and the colors won’t rub off on your skin. An adult can put the cookie sheet in the preheated  oven and watch carefully. The knives will shrink and the sides will probably start to curl up into a bracelet shape on their own (if they don’t, don’t worry, you can shape them in the next step). When the bracelets look to be about the right size for the person who will be wearing them, the grown-up should take them out of the oven quickly using oven mitts. Then, while they are still hot, the adult can shape the bracelets using the metal tongs. The bracelets will probably be about the right shape already, but you will want to make sure the opening is big enough to slip a wrist through. Also, if the edges did not curl in the oven, now is the time to curl them using the tongs.
Once they have cooled and hardened, the bracelets will be ready to wear. Since the colored side is on the outside of the bracelet, the color should not rub off much. However, if you’d like a little more protection to help your bracelet last longer, I suggest painting it with a layer Mod Podge and letting it dry.
** Some people are concerned about the safety of eating out of #6 plastic containers. If you have a concern, please use discretion. Personally, seeing as it is the same kind of plastic as Shrinky Dinks (see here), I found this project safe enough.**


